Vue设计思路
项目文件结构
在Vue项目中,所有核心的代码都是在src目录下完成,为了更好的了解Vue的底层实现,我们首先来了解一下src目录下代码的组织情况,从全局入手,在脑海里留下简单的印象,方便后续的学习。(注意:当前使用Vue的版本为2.6.12,不同版本的内容可能会有所差异)
.
├── compiler  // 编译模块:将 template 编译成为可以生成 vnode 的 render 函数
│   ├── codeframe.js
│   ├── codegen             // 代码生成文件:根据 ast 树可生成 vnode 的 render代码
│   ├── create-compiler.js  // 创建编译器的工厂函数
│   ├── directives          // 指令解析:v-on, v-bind, v-model
│   ├── error-detector.js
│   ├── helpers.js          // 编译相关方法,如属性获取等方法
│   ├── index.js            // 入口文件
│   ├── optimizer.js        // 编译优化:将 ast 树进行优化
│   ├── parser                      // html 解析文件:将 template 解析成 ast 树🌲
│   └── to-function.js      // 创建编译器的工厂函数
├── core     // 构造函数核心模块:构建Vue构造函数,添加原型方法,实现完成渲染流程的_init方法
│   ├── components  // 自带的全局组件,如 keep-alive
│   ├── config.js   // 配置相关
│   ├── global-api  // 全局api,如 Vue.use, extend, mixin, component等方法
│   ├── index.js    // 入口文件,在 Vue 上挂载全局方法并导出 Vue
│   ├── instance    // 构造函数起始位置
│   ├── observer    // 响应式原理
│   ├── util        // 一些工具方法,包含 mergeOptions, nextTick 等方法的实现
│   └── vdom        // 虚拟 dom
├── platforms // 平台相关,包含不同平台的不同构建入口,这里主要研究web端
│   ├── weex
│   └── web
│       ├── compiler   // 与平台相关的编译
│       ├── entry-compiler.js // vue-template-compiler 包的入口文件
│       ├── entry-runtime-with-compiler.js // 构建入口,包含编译器
│       ├── entry-runtime.js  // 构建入口,不包含编译器,不支持 template 转换 render
│       ├── entry-server-basic-renderer.js
│       ├── entry-server-renderer.js
│       ├── runtime   // 与平台相关的构建
│       ├── server
│       └── util
│
├── server    // 服务端渲染相关
├── sfc       // 包含单文件组件(.vue文件)的解析逻辑,用于vue-template-compiler包
└── shared    // 代码库通用代码
    ├── constants.js
└── util.js以上是Vue项目中主要文件目录,里面附带一些注释,讲解了比较主要模块的功能及作用。刚开始学习时只做简单了解即可,后面我们会逐步详细学习其中的一些模块,从而从原理级别理解整个Vue项目的设计与实现。
Vue的真面目
要想真正的了解Vue是如何工作的,首先我们需要找到Vue是在哪里被定义的。我们先找到package.json文件下的scripts配置。scripts里存放的都是运行命令的别名形式,通过命令可以轻松找到对应命令执行文件的路径。
"scripts": {
    "dev": "rollup -w -c scripts/config.js --environment TARGET:web-full-dev"
}这里当运行dev命令实际上是运行scripts/config.js文件,让我们找到scripts/config.js文件。
通过运行命令参数我们可以知道process.env.TARGET的值为web-full-dev,因此可以在builds里找到对应的配置文件,如下
const builds = {
  'web-full-dev': {
      entry: resolve('web/entry-runtime-with-compiler.js'),
      dest: resolve('dist/vue.js'),
      format: 'umd',
      env: 'development',
      alias: { he: './entity-decoder' },
      banner
   }
  ...
}

module.exports = genConfig(process.env.TARGET)通过entry,我们找到web/entry-runtime-with-compiler.js文件:
import Vue from './runtime/index'

const mount = Vue.prototype.$mount
Vue.prototype.$mount = function (
  el?: string | Element,
  hydrating?: boolean
): Component {
  ...
}
Vue.compile = compileToFunctions

export default Vue在这里,我们终于找到了Vue相关的文件,这也是Vue的起始入口。接着根据Vue的引入路径,找到./runtime/index文件:
import Vue from 'core/index'
...
Vue.prototype.__patch__ = inBrowser ? patch : noop
Vue.prototype.$mount = function (
  el?: string | Element,
  hydrating?: boolean
): Component {
  ...
}
export default Vue这里还不是Vue真正的起始点,继续查找core/index文件:
import Vue from './instance/index'
initGlobalAPI(Vue)
...
Vue.version = '__VERSION__'
export default Vue发现仍然不是Vue的起始点,继续查找'./instance/index'文件:
import { initMixin } from './init'
import { stateMixin } from './state'
import { renderMixin } from './render'
import { eventsMixin } from './events'
import { lifecycleMixin } from './lifecycle'
import { warn } from '../util/index'

// Vue 构造函数
function Vue (options) {
  if (process.env.NODE_ENV !== 'production' &&
    !(this instanceof Vue)
  ) {
    warn('Vue is a constructor and should be called with the `new` keyword')
  }
  this._init(options)
}

// 向原型上添加方法属性
initMixin(Vue)
stateMixin(Vue)
eventsMixin(Vue)
lifecycleMixin(Vue)
renderMixin(Vue)

export default Vue好了,大功告成!费劲千辛万苦终于找到了Vue的真正定义的位置!可以看出Vue其实就是一个构造函数,而构造函数内部仅仅只是调用了_init方法,看上去非常简单。但是Vue是如何通过这么简单的定义实现那么复杂的功能呢?这里就要涉及到构造函数、原型、实例的概念了,不了解这些概念的建议参考《javascript高级设计程序》中原型章节来进行学习。下面我们通过下方三个方面来介绍Vue的实现。
- 原型方法属性:通过 5 个
init方法,向Vue的原型上添加方法, - 静态方法属性:在导入
Vue构造函数的过程中,向Vue构造函数上添加静态方法,也有向原型上添加方法 - 实例化:在实例化的过程中,执行
_init方法,完成整个Vue初始化到渲染的逻辑。
Vue的原型方法属性
initMixin
initMixin方法主要实现了_init方法。
export function initMixin (Vue: Class<Component>) {
  Vue.prototype._init = function (options?: Object) {
    // init 实现内容,由于这里仅做概览,所以具体实现均已省略
    ...
  }
}从上面Vue构造函数我们可以知道,这个方法在实例化时有被调用,它主要的作用是实现:选项的合并,数据初始化(如响应式处理),以及触发编译和渲染的流程,所以十分重要。这里也只是先做一个了解,后续的实例化章节将都会从这个方法开始分析。
stateMixin
stateMixin主要实现了data,props的代理功能,即当我们访问$data时,实际访问的是_data。另外在非生产环境下,会对$data,$props进行 set处理,每次设置新的值时都会打印提示,所以实际上$data,$props都是只读属性。
export function stateMixin (Vue: Class<Component>) {
  const dataDef = {}
  dataDef.get = function () { return this._data }
  const propsDef = {}
  propsDef.get = function () { return this._props }
  // 只读属性
  if (process.env.NODE_ENV !== 'production') {
    dataDef.set = function () {
      warn(
        'Avoid replacing instance root $data. ' +
        'Use nested data properties instead.',
        this
      )
    }
    propsDef.set = function () {
      warn(`$props is readonly.`, this)
    }
  }
  Object.defineProperty(Vue.prototype, '$data', dataDef)
  Object.defineProperty(Vue.prototype, '$props', propsDef)
  Vue.prototype.$set = set
  Vue.prototype.$delete = del
  Vue.prototype.$watch = function () { ... }
}除此之外,这里还在Vue原型上挂载了比较常见的三个方法:$set,$delete,$watch。
eventsMixin
和node里EventEmitter类似,eventsMixin实现了四个方法:$on,$off,$once,$emit,用于监听,触发,销毁事件。
export function eventsMixin (Vue: Class<Component>) {
  const hookRE = /^hook:/
  Vue.prototype.$on = function () { ... }
  Vue.prototype.$once = function () { ... }
  Vue.prototype.$off = function () { ... }
  Vue.prototype.$emit = function () { ... }
}
lifecycleMixin
lifecycleMixin实现了三个方法:_update方法非常重要,它主要负责将vnode生成真实节点。
export function lifecycleMixin (Vue: Class<Component>) {
  // 更新,将 vnode 生成 真实节点
  Vue.prototype._update = function () { ... }
  // 强制刷新
  Vue.prototype.$forceUpdate = function () { ... }
  // 销毁
  Vue.prototype.$destroy = function () { ... }
}
renderMixin
renderMixin主要做了三项工作
export function renderMixin (Vue: Class<Component>) {
  installRenderHelpers(Vue.prototype)

  Vue.prototype.$nextTick = function (fn: Function) {
    return nextTick(fn, this)
  }

  Vue.prototype._render = function (): VNode {
    return vnode
  }
}installRenderHelpers函数用于添加render相关方法,在编译环节最后生成的代码,都是由这些方法拼接而成的代码,所以也是非常的重要,在这里先混个眼熟。
  target._o = markOnce
  target._n = toNumber
  target._s = toString
  target._l = renderList
  target._t = renderSlot
  target._q = looseEqual
  target._i = looseIndexOf
  target._m = renderStatic
  target._f = resolveFilter
  target._k = checkKeyCodes
  target._b = bindObjectProps
  target._v = createTextVNode
  target._e = createEmptyVNode
  target._u = resolveScopedSlots
  target._g = bindObjectListeners
  target._d = bindDynamicKeys
target._p = prependModifier$nextTick方法,在下一次事件循环触发,涉及到事件循环机制。_render方法,用于生成vnode。
Vue的静态方法属性
通过上面5个init方法我们已经了解了许多原型方法的添加过程,但是在Vue中还有很多全局方法,比如Vue.component,Vue.use等方法,它们都是构造函数的静态属性,下面我们看看这些静态属性是如何添加的。与寻找Vue的起始位置过程恰恰相反,这次我们从Vue的起始文件出发,看看最后导出的Vue是怎样的。
/src/core/index.js文件
这是第一层引入Vue构造函数的文件
import { initGlobalAPI } from './global-api/index'

initGlobalAPI(Vue)

// ... 中间省略

Vue.version = '__VERSION__'这里我们看一下initGlobalAPI方法,打开core/global-api/index.js文件
export function initGlobalAPI (Vue: GlobalAPI) {
  Vue.util = {
    warn,
    extend,
    mergeOptions,
    defineReactive
  }

  Vue.set = set
  Vue.delete = del
  Vue.nextTick = nextTick

  // 2.6 explicit observable API
  Vue.observable = <T>(obj: T): T => {
    observe(obj)
    return obj
  }

  Vue.options = Object.create(null)
  ASSET_TYPES.forEach(type => {
    Vue.options[type + 's'] = Object.create(null)
  })

  Vue.options._base = Vue

  extend(Vue.options.components, builtInComponents)

  initUse(Vue)
  initMixin(Vue)
  initExtend(Vue)
  initAssetRegisters(Vue)
}这里挂载了很多静态方法,Vue中大多数的全局方法都在这个位置添加的,这里我们着重分析一下options:
  import builtInComponents from '../components/index'

  Vue.options = Object.create(null)
  ASSET_TYPES.forEach(type => {
    Vue.options[type + 's'] = Object.create(null)
  })

  Vue.options._base = Vue

extend(Vue.options.components, builtInComponents)可以看出,在Vue构造函数上添加了一个options属性(注意!这里是静态属性,为构造函数所有,区别于在实例化传入的options)。随后又通过遍历ASSET_TYPES,在options上添加了components,directives,filters属性。另外还添加了_base,指向当前构造函数Vue。最后通过extend方法将builtInComponents合并到options.components当中。这里的builtInComponents实际上就是Vue自带的组件,即keep-alive组件。所以最终Vue.options的内容如下:
// Vue.options 内容
{
  components: {
    KeepAlive
  },
  filters: {},
  directives: {},
  _base: Vue
}这里之所以额外提起,是因为在后续选项合并时,会使用此处的options进行合并。
/src/platforms/web/runtime/index.js文件
这里是第二层引入Vue的文件,主要给Vue处理平台相关的一些方法
import Vue from 'core/index'
import config from 'core/config'
import { extend, noop } from 'shared/util'
import { mountComponent } from 'core/instance/lifecycle'
import { devtools, inBrowser } from 'core/util/index'

import {
  query,
  mustUseProp,
  isReservedTag,
  isReservedAttr,
  getTagNamespace,
  isUnknownElement
} from 'web/util/index'

import { patch } from './patch'
import platformDirectives from './directives/index'
import platformComponents from './components/index'

// install platform specific utils
Vue.config.mustUseProp = mustUseProp
Vue.config.isReservedTag = isReservedTag
Vue.config.isReservedAttr = isReservedAttr
Vue.config.getTagNamespace = getTagNamespace
Vue.config.isUnknownElement = isUnknownElement

// install platform runtime directives & components
extend(Vue.options.directives, platformDirectives)
extend(Vue.options.components, platformComponents)

Vue.prototype.__patch__ = inBrowser ? patch : noop
Vue.prototype.$mount = function () { ... }

export default Vue这里首先给Vue.config添加了一系列方法,注意,这些方法之所以在这里添加而不是在core/index.js文件里添加,是因为这里的方法都与平台相关,不同的平台的方法实现也会不一样。
extend(Vue.options.directives, platformDirectives)
extend(Vue.options.components, platformComponents)这两个extend实际上进一步扩充了Vue.options方法,扩充后的内容如下:
// Vue.options 内容
{
  components: {
    KeepAlive,
    // 新增 platformComponents
    Transition,
    // 新增 platformComponents
    TransitionGroup
  },
  filters: {},
  directives: {
    // 新增 platformDirectives
    model,
    // 新增 platformDirectives
    show
  },
  _base: Vue
}这也是为什么我们可以不用注册也能全局使用v-model,v-show的原因了,因为Vue已经帮我们全局注册了。
/src/platforms/web/entry-runtime-with-compiler.js文件
这是最后一层引入Vue了:
import Vue from './runtime/index'
...

const mount = Vue.prototype.$mount
Vue.prototype.$mount = function (
  el?: string | Element,
  hydrating?: boolean
): Component {

    ...

  return mount.call(this, el, hydrating)
}

Vue.compile = compileToFunctions

export default Vue这里主要是重新实现了$mount方法,但是为什么原先在runtime/index.js文件里实现了$mount方法,这里又要重新实现一遍呢?因为runtime/index.js里的$mount与编译是无关的,无法处理template模板代码,而这里重写的$mount实际上还是调用了runtime/index.js里的$mount,但是在此之前,增加了从template到render的编译过程。
实例化过程
前面已经将Vue的各种方法属性挂载完毕,现在则是需要进行实例化了,也就是调用之前提到的_init方法。打开/src/core/instance/init.js文件,代码如下:
Vue.prototype._init = function (options?: Object) {
    const vm: Component = this
    ...

    // 1. 合并options
    if (options && options._isComponent) {
      initInternalComponent(vm, options)
    } else {
      vm.$options = mergeOptions(
        resolveConstructorOptions(vm.constructor),
        options || {},
        vm
      )
    }

    ...

    // 2. 初始化数据
    initLifecycle(vm)
    initEvents(vm)
    initRender(vm)
    callHook(vm, 'beforeCreate')
    initInjections(vm) // resolve injections before data/props
    initState(vm)
    initProvide(vm) // resolve provide after data/props
    callHook(vm, 'created')

    // 3. 编译并挂载
    if (vm.$options.el) {
      vm.$mount(vm.$options.el)
    }
  }
在初始化的过程中,主要分为三个阶段:
阶段一:合并选项,将 Vue.options和传入的options进行合并。
阶段二:初始化数据,并对数据进行响应式处理。
阶段三:编译代码,得到render函数,将vnode生成真实节点,并挂载到界面。
由于这部分比较核心,且难以理解,这里仅做了解,后续会逐一进行分析。
Vue的整体设计
通过上面的分析,我们已经对Vue原型方法,Vue静态方法属性,Vue实例化过程有了大致的了解,下面我们用张图总结下整体的内容,也就是Vue整体的设计思路。
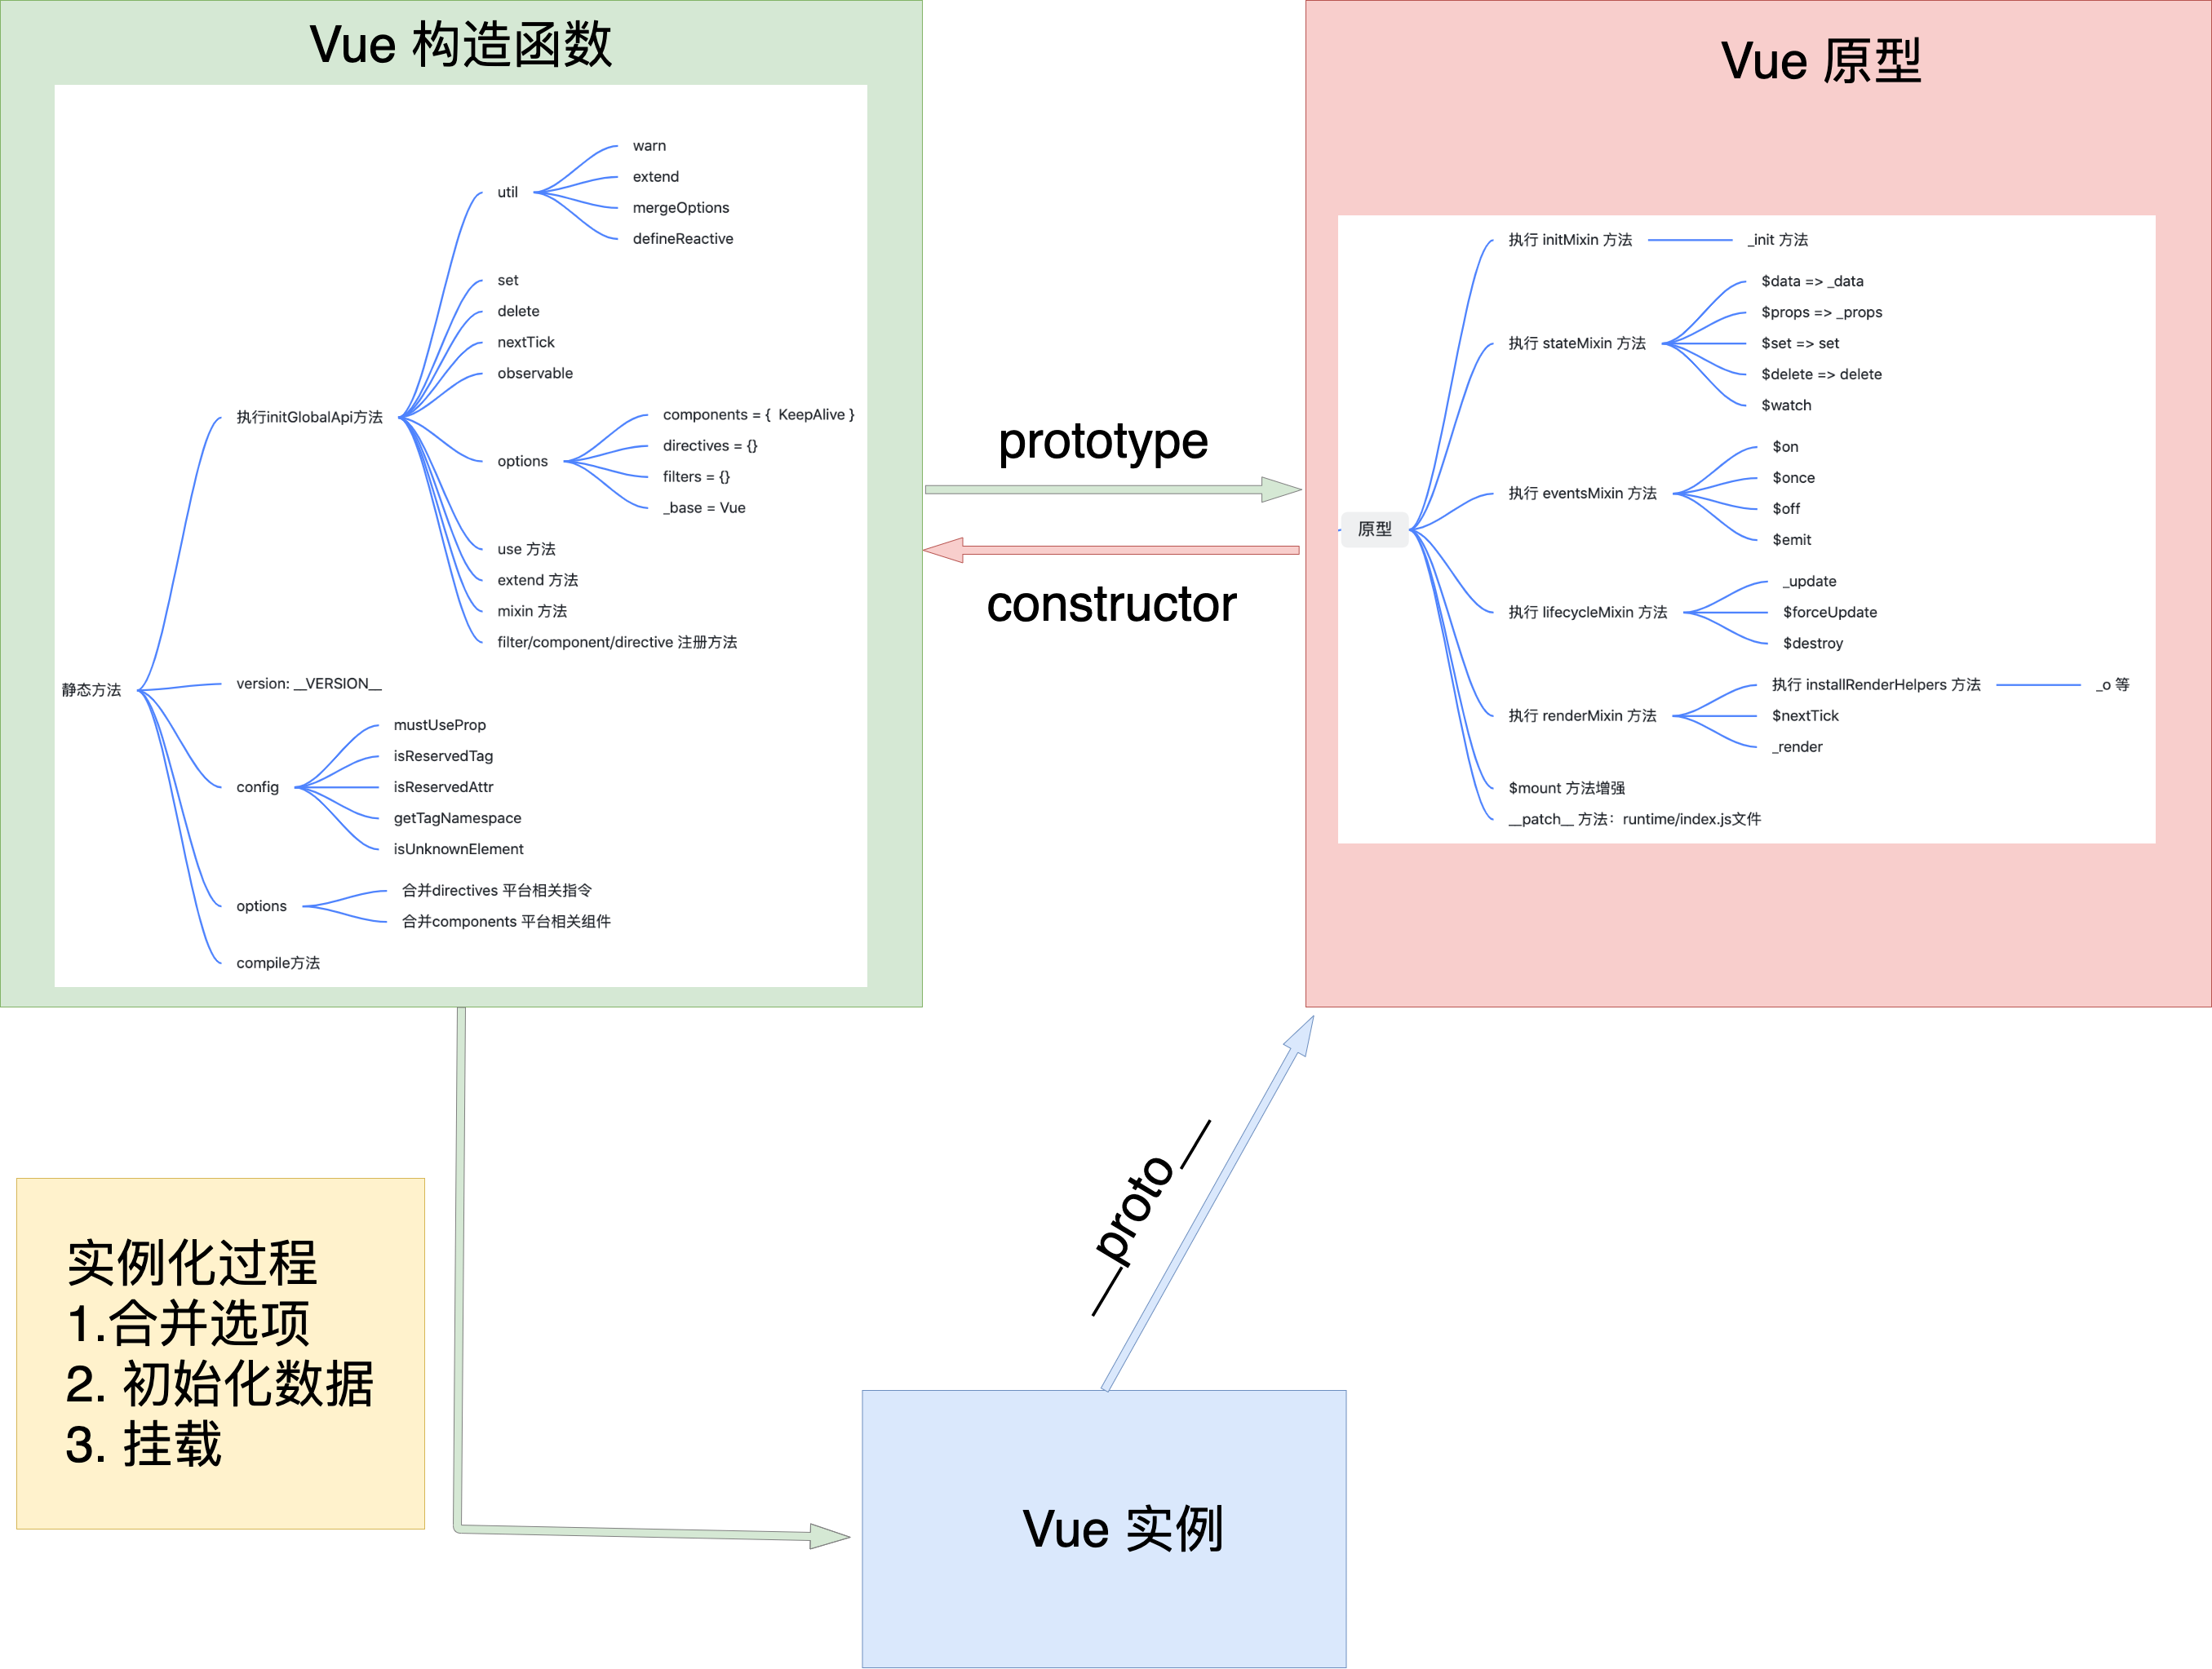
总结下来就是:
- 构建一个具有完备功能的构造函数,并且在上面添加各个模块需要的方法属性。包括原型方法属性和静态方法属性。
- 进行实例化,在实例化过程中进行各种处理,其中包括:选项合并,数据响应式处理,编译,虚拟
DOM更新等等。
这里的描述比较笼统,旨在从整体上来对Vue进行一个了解。在接下来的章节我们会详细分析实例化的整个过程,从而由点及面的了解Vue。下一章节我们将开始Vue核心代码的正式学习。