编译过程之generate方法
先简单复习一下Vue的编译过程,整个过程分为三个步骤:
第一步是parse解析阶段,前面的章节已经讲过parse方法的具体实现,该方法主要是将template解析成易于处理的抽象语法树(ast)。
第二步是optimize优化阶段,该阶段主要是将template中的静态节点在ast中标记出来,方便后续生成虚拟Dom的时候进行复用。
第三步是generate生成代码阶段,也是我们这章要学习的部分。该阶段是将ast树转换成能生成对应虚拟Dom的render函数。
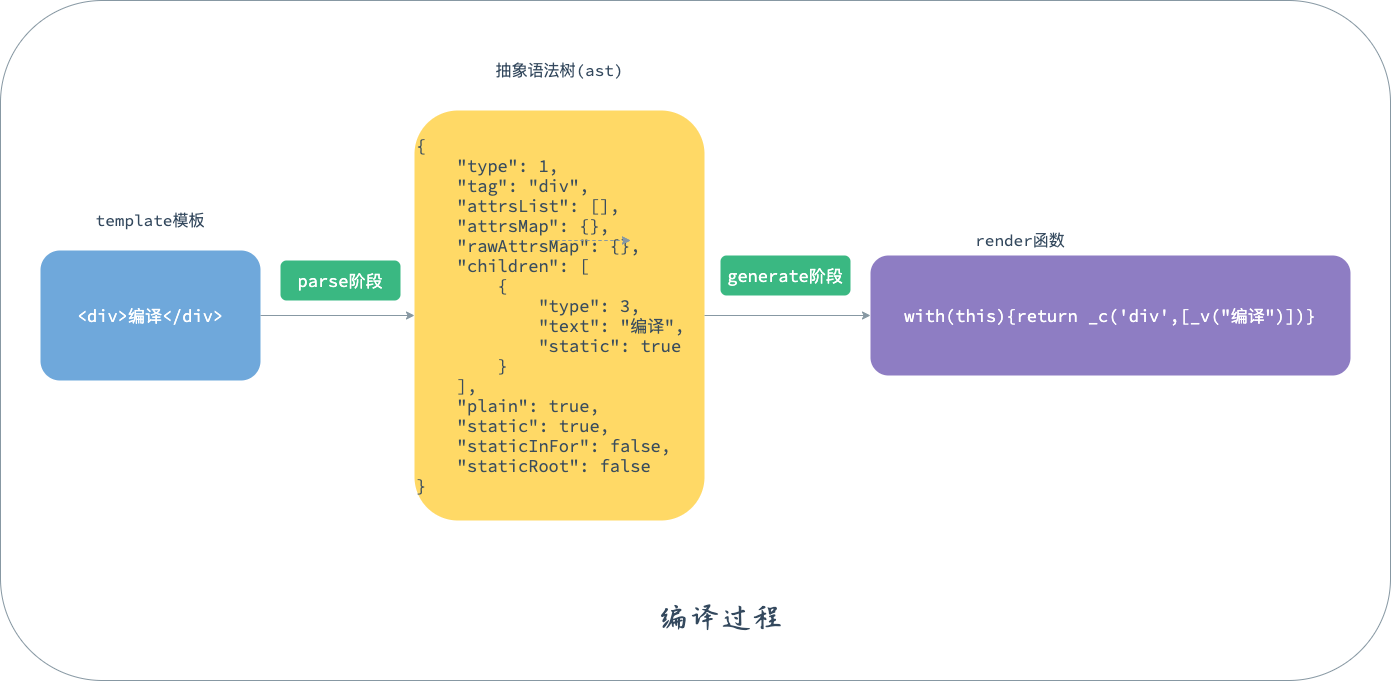
这一章我们主要讨论generate阶段,看看抽象语法树是如何转换成render函数的。
with语法
我们先看下最终生成的代码代表的是什么意思:
with(this){return _c('div',[_v("编译")])}从生成的代码可以看出,render函数是以with开头的,我们先了解下with是如何使用的。
const obj = { a: 3 }
with (obj) {
  console.log(a) // 3
  console.log(this.a) // undefined
  console.log(b) // 报错
}借用mdn上的一句话:with语句扩展一个语句的作用域链。本来访问a的时候是访问的全局作用域,加了with之后,访问a的作用域则是obj。with使用起来相对比较简单。回到Vue的render函数中,可以知道render函数里的作用域就是Vue的实例vm,所以render执行的时候,访问变量实质上就是访问Vue实例上的属性。至于为什么要使用with语法,可以看下尤大大的一篇回答。
renderHelpers
还是那段编译生成的代码,在with内部的代码中有_c,_v这样的方法。由于this是指向Vue实例的,所以访问_c的时候其实访问的是vm._c。但是_c、_v这些方法是哪里定义的呢?
with(this){return _c('div',[_v("编译")])}这就要追溯到Vue构造函数与原型的章节了,在src/core/instance/render.js文件中找到renderMixin方法,这个方法是在我们学习Vue原型设计的时候提到的:
export function renderMixin (Vue: Class<Component>) {
  // install runtime convenience helpers
  installRenderHelpers(Vue.prototype)
  Vue.prototype.$nextTick = function (fn: Function) {...}
  Vue.prototype._render = function (): VNode {...}
}在./render-helpers找到installRenderHelpers函数:
export function installRenderHelpers (target: any) {
  target._o = markOnce
  target._n = toNumber
  target._s = toString
  target._l = renderList
  target._t = renderSlot
  target._q = looseEqual
  target._i = looseIndexOf
  target._m = renderStatic
  target._f = resolveFilter
  target._k = checkKeyCodes
  target._b = bindObjectProps
  target._v = createTextVNode
  target._e = createEmptyVNode
  target._u = resolveScopedSlots
  target._g = bindObjectListeners
  target._d = bindDynamicKeys
  target._p = prependModifier
}installRenderHelpers主要任务就是挂载了渲染需要用到的函数!所以调用_v就是调用createTextVNode方法,从字面意思我们就可以知道,其实它就是创建一个文本的Vnode节点。但是这里并没有定义_c,那么_c在哪呢?还记得数据初始化环节吗,同样是在src/core/instance/render.js文件中,不过是initRender方法:
export function initRender (vm: Component) {
  ...
  vm._c = (a, b, c, d) => createElement(vm, a, b, c, d, false)
  vm.$createElement = (a, b, c, d) => createElement(vm, a, b, c, d, true)
 ...
}_c同样是创建Vnode节点的函数。所以render函数就是由一堆生成Vnode节点函数的集合。接下来我们看下具体是如何使用这些函数的。
generate
generate过程的代码都是在src/compiler/codegen目录中,里面只有两个文件,相对来说比较少。在index.js中找到generate函数:
export function generate (
  ast: ASTElement | void,
  options: CompilerOptions
): CodegenResult {
  const state = new CodegenState(options)
  const code = ast
   ? (ast.tag === 'script' ? 'null'
   : genElement(ast, state)) : '_c("div")'
  return {
    render: `with(this){return ${code}}`,
    staticRenderFns: state.staticRenderFns
  }
}里面的核心实现是调用了genElement方法:
if (el.staticRoot && !el.staticProcessed) {
  return genStatic(el, state)
} else if (el.once && !el.onceProcessed) {
  return genOnce(el, state)
} else if (el.for && !el.forProcessed) {
  return genFor(el, state)
} else if (el.if && !el.ifProcessed) {
  return genIf(el, state)
} else if (el.tag === 'template' && !el.slotTarget && !state.pre){
  return genChildren(el, state) || 'void 0'
} else if (el.tag === 'slot') {
  return genSlot(el, state)
} else {...}可以看出,genElement里面有很多判断逻辑,根据不同的判断条件调用不同的生成函数。我们分别看下各个生成函数是怎样的。
genStatic
staticRoot是在optimize优化阶段添加的。当el.staticRoot为true时,代表el是静态节点:
state.staticRenderFns.push(`with(this){return ${genElement(el, state)}}`)

return `_m(${
  state.staticRenderFns.length - 1
}${
  el.staticInFor ? ',true' : ''
})`这里主要的代码就两行。with(this){return ${genElement(el, state)}}就是将el生成Vnode的代码,然后将其添加到staticRenderFns中,再使用_m函数进行封装一遍,_m函数又是调用的renderStatic函数:
const cached = this._staticTrees || (this._staticTrees = [])
let tree = cached[index]
if (tree && !isInFor) {
  return tree
}

tree = cached[index] = this.$options.staticRenderFns[index].call(
  this._renderProxy,
  null,
  this // for render fns generated for functional component templates
)
markStatic(tree, `__static__${index}`, false)
return tree通过代码不难看出,该方法将staticRenderFns[index].call()生成的Vnode缓存到_staticTrees上了。_staticTrees键为index,值为生成的Vnode,下次执行renderStatic函数的时候,就会从_staticTrees取出相应的Vnode,从而跳过执行staticRenderFns[index].call(),达到优化编译速度的目的。另外这里的_staticTrees也是在initRender的时候初始化的。
genFor
return `${altHelper || '_l'}((${exp}),` +
    `function(${alias}${iterator1}${iterator2}){` +
      `return ${(altGen || genElement)(el, state)}` +
'})'genFor方法比较简单,主要是调用了_l方法(即renderList方法),将解析的exp,alias,iterator1,iterator2作为参数传入,然后循环exp调用genElement生成Vnode数组。
genIf/genIfConditions
在parse解析template的时候,会将if/else-if/else三种情况解析成一个数组,类似于下方这样的形式:
// 解析前
<div v-if="isTrue">编译1</div>
<div v-else-if="isFalse">编译2</div>
<div v-else>编译3</div>

// 解析后
[
  {
    "exp": "isTrue",
    "block": "存放isTrue为true的时候显示的 el"
  },
  {
    "exp": "isFalse",
    "block": "存放isFalse为true的时候显示的 el"
  },
  {
    "block": "存放其他情况显示的 el
  }
]所以我们需要遍历这个数组,然后依次判断exp是否为true,如果为true就显示block里存放的el。回到genIf函数,它调用的则是genIfConditions函数:
const condition = conditions.shift()
if (condition.exp) {
  return `(${condition.exp})?${
    genTernaryExp(condition.block)
  }:${
    genIfConditions(conditions, state, altGen, altEmpty)
  }`
} else {
  return `${genTernaryExp(condition.block)}`
}genIfConditions每次会从数组中取一个条件出来,判断是否成立。如果不成立就递归调用genIfConditions,直到所有的判断条件取完。
genOnce
genOnce主要分为三种情况:
- 与
if并存,这个时候就先执行genIf再执行genOnce。 - 在
for循环中且为静态节点,用_o方法进行标记。 - 否则使用
genStatic方法生成节点,genStatic具有缓存性。
genChildren/genNode
genChildren是一个递归的过程,通过遍历children节点然后调用genNode方法生成Vnode:
if (node.type === 1) {
  return genElement(node, state)
} else if (node.type === 3 && node.isComment) {
  return genComment(node)
} else {
  return genText(node)
}如果是node.type为1,那么又会回到genElement方法继续生成Vnode。否则生成文本节点或注释节点。
genComponent
const children = el.inlineTemplate ? null : genChildren(el, state, true)
return `_c(${componentName},${genData(el, state)}${
    children ? `,${children}` : ''
})`genComponent比较简单,和普通节点生成类似,不同点则是标签名称是组件名称。
genData
genData的主要作用是处理属性相关的内容,如指令、属性、props、绑定事件等等,它们分别通过genDirectives、genProps、genHandlers等函数进行分别处理的。这里主要看一下slot相关的方法:genScopedSlots。
// 编译前
<div>
  <template v-slot:header="header">编译header</template>
  <template v-slot:footer="footer">编译footer</template>
</div>

// 编译后 ast 大致内容
{
  scopedSlots: {
    header: {
      ...
      节点header
    },
    footer: {
      ...
      节点footer
    }
  }
}genScopedSlots则是遍历scopedSlots生成节点:
const generatedSlots = Object.keys(slots)
  .map(key => genScopedSlot(slots[key], state))
.join(',')单个节点生成使用的是genScopedSlot方法:
function genScopedSlot (
  el: ASTElement,
  state: CodegenState
): string {
 ...
  const fn = `function(${slotScope}){` +
    `return ${el.tag === 'template'
      ? el.if && isLegacySyntax
        ? `(${el.if})?${genChildren(el, state) || 'undefined'}:undefined`
        : genChildren(el, state) || 'undefined'
      : genElement(el, state)
    }}`
  ...
  return `{key:${el.slotTarget || `"default"`},fn:${fn}${reverseProxy}}`
}该方法的作用是将插槽内要插入的children生成了Vnode,最终的生成结果如下:
{
  scopedSlots: _u([
    {
      key: 'header',
      fn: function (header) {
        return [_v('编译1')]
      }
    },
    {
      key: 'footer',
      fn: function (footer) {
        return [_v('编译2')]
      }
    }
  ])
}_u方法调用的是resolveScopedSlots方法,该方法主要将上面的数组形式转换成了对象形式,如:
{
 header: function (header) {
        return [_v('编译1')]
      },
 footer: function (footer) {
        return [_v('编译2')]
      }
}
genSlot
genSlot的核心过程是使用了_t方法:
let res = `_t(${slotName}${children ? `,${children}` : ''}`我们看一下_t也就是renderSlot方法:
// $scopeSlots 是父组件中定义的 slot,这里取到对应的 Vnode 或 生成 Vnode 的函数
const scopedSlotFn = this.$scopedSlots[name]
let nodes
if (scopedSlotFn) { // scoped slot
  // props 为在 slot 标签上定义的 属性
  props = props || {}
  // bindObject 为 slot 上使用 v-bind 的属性
  if (bindObject) {
    if (process.env.NODE_ENV !== 'production' && !isObject(bindObject)) {
      warn(
        'slot v-bind without argument expects an Object',
        this
      )
    }
    props = extend(extend({}, bindObject), props)
  }
  // 传入参数,使得父组件中 v-slot 能够接受参数
  nodes = scopedSlotFn(props) || fallback
} else {
  // 直接使用 vnode
  nodes = this.$slots[name] || fallback
}

const target = props && props.slot
if (target) {
  return this.$createElement('template', { slot: target }, nodes)
} else {
  return nodes
}首先this.$scopedSlots[name]就是拿到父组件中可以将插槽内容生成Vnode的函数,然后执行生成Vnode数组,添加到子组件中。这里还有其他判断,主要对应于是否是具名插槽,是否有插槽传值等情况。这个在后面插槽章节再详细讲解,这里先简单了解一下。
总结
编译过程中generate的阶段,实际上就是将抽象语法树根据不同的情景使用不同的render工具方法拼接成可以生成Vnode的render函数。类似于for/if这些语法,经过generate处理后,都会根据相应的数据逻辑生成对应的Vnode。事实上,这个Vnode的结构和我们真实Dom的结构相差无几,下一步要做的就是将虚拟Dom映射成真实Dom了。